Our Repository
Here's our repository. Feel free to clone it and open it in Unity!
Unity Editor
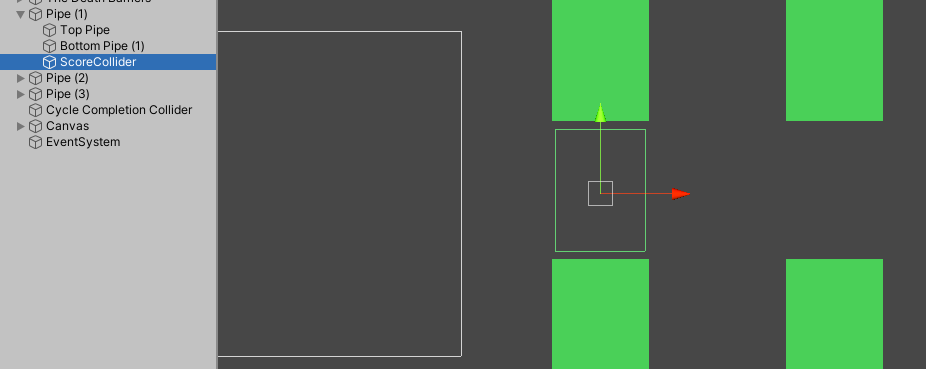
Scene Hierarchy
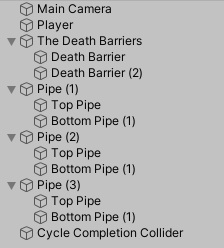
Here's the scene hierarchy! The Death Barriers are the top and bottom of scene, when the flappy bird player goes out of bounds. Make sure to add the "Death" tag to the Box Collider 2D component.
There are 3 Pipes which have 3 child elements, the top and bottom one, also with the "Death" tag, and the ScoreCollider. Next, the Cycle Completion Collider detects if the pipes have passed the screen on the left and respawn to their original point. Finally, add a canvas element on which add a Text (TMP) element.
Player
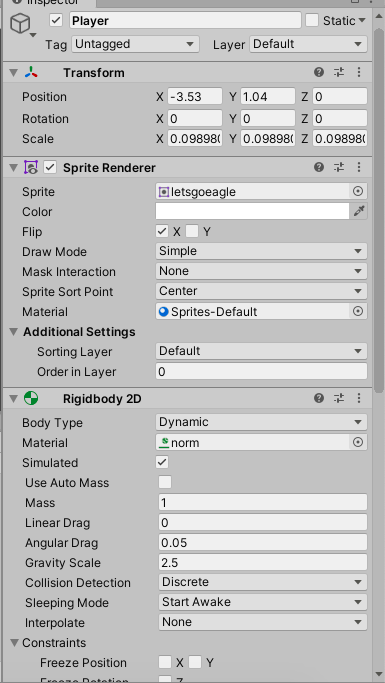
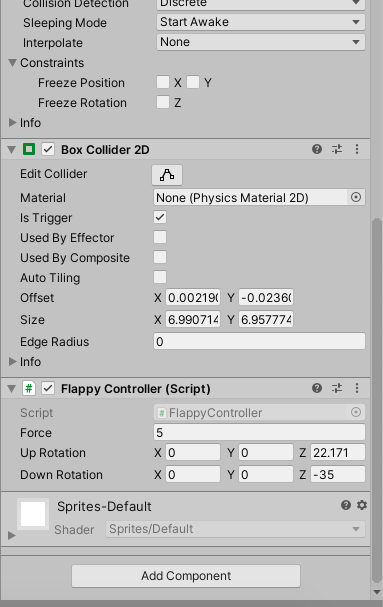
Here is the Inspector panel for the Player. Make sure to change the Sprite Renderer Sprite with a different texture! Also make sure to enable Is Trigger in the Box Collider 2D component. Also, add a FlappyController Script (C#). We will code it later, but make not of these variables we can change (Force, Up Rotation, Down Rotation).
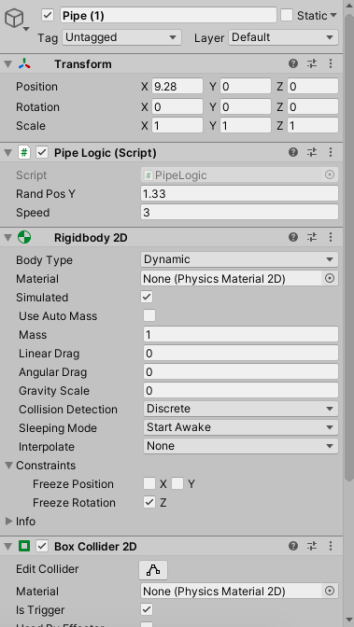
Pipes
For each pipe, add a Rigidbody2D component and Box Collider 2D component. Make sure to make the Box Collider 2D a trigger! In the top and bottom pipe child game objects, add a "Death" tag to them!
Make sure to add a ScoreCollider element to each pipe, and connect the ScoreCollider script to it.
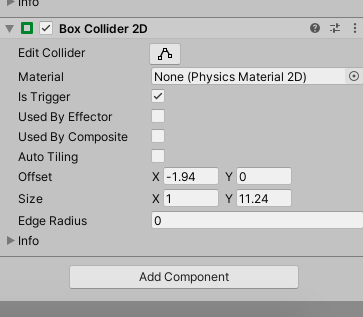
ScoreCollider Preview
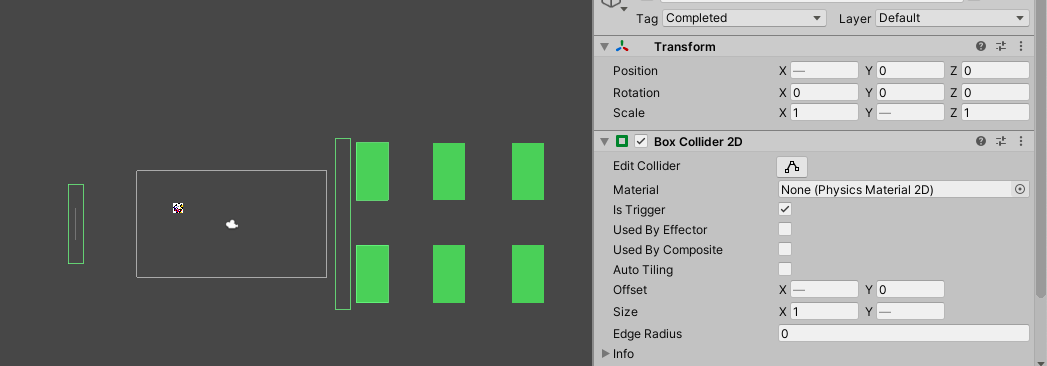
Cycle Completion Collider
Add a "Completed" tag to the Cycle Completion Collider, and a Box Collider 2D. Position them as in the image!
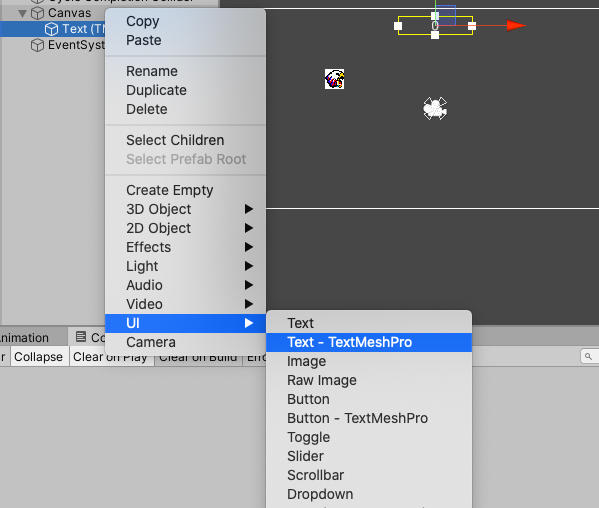
Text Mesh Pro and UI
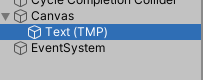
Select a Text Mesh Pro element as below!
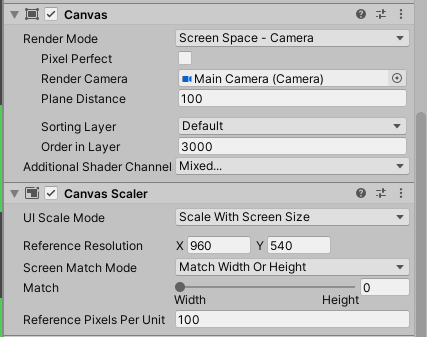
Here is the Canvas Inspector! Make sure to add a ScoreTracker.cs script attached to the Text Mesh Pro element!
Code Walkthrough
FlappyController.cs
We create a class FlappyController that extends from the Unity MonoBehaviour class. This allows us to connect the script to our Flappy Bird character sprite and its other components.
Program Structure
The Start() method is called on the first frame when the character is created.
The Update() method is called every frame to perform various actions from calculating points, moving the character, getting input, etc.
We declare the following fields:
Rigidbody2D rb;
public float force;

public Vector3 upRotation = new Vector3(0, 0, 22.171f);
public Vector3 downRotation = new Vector3(0, 0, -35);
Rigidbody2D, another component of the flappy bird, is obtained from by using
void Start()
{
    rb = gameObject.GetComponent<Rigidbody2D>();
}IMPORTANT: Note the use of public fields. We can set these fields not through code, but in the Unity UI when editing the script. These essentially act as parameters to our script.
User Input and Update()
To get input, we use the Input class. For example, if we want to check if the space bar every frame was pressed, we would type:
if (Input.GetKeyDown(KeyCode.Space))
{
    // do something here
}
Or alternatively, if we wanted to check if any key was pressed, we could write:
if (Input.anyKeyDown)
{
    // do something here
}
If the user presses on a key, we want our bird to jump. We can do this by setting the velocity to face in the up direction. Conveniently Vector2.up already defines the up direction... So we can multiply rb.velocity by a certain force that we defined in earlier. We also want to change the bird's rotation. We will use Quaternions, which represent a 3D rotation, to do this, as seen below.
if (Input.anyKeyDown)
{
    rb.velocity = Vector2.up * force;
    transform.rotation = Quaternion.Euler(upRotation);
}
Next, we want the bird's rotation to also change every frame, so we use another math function: smooth interpolation (You do not need to worry about the implementation details)!
void Update()
{
    if (Input.anyKeyDown)
    {
        rb.velocity = Vector2.up * force;
        transform.rotation = Quaternion.Euler(upRotation);
    }

    transform.rotation = Quaternion.Slerp(transform.rotation, Quaternion.Euler(downRotation), Time.deltaTime * 2);
}
Another key takeaway from this piece code is Time.deltaTime, which gives you the elapsed time since the last frame. This is useful, to make sure the fast computers do not have a speed advantage over others! Here's an excellent video explaining it.
Again do not worry about understanding Quaternions. Just know that they represent a 3D rotation. This is a very complicated university math topic!
Here's the final code in case you need it!
FlappyController.cs
using System.Collections;
using System.Collections.Generic;
using UnityEngine;

public class FlappyController : MonoBehaviour
{
    Rigidbody2D rb;
    public float force;

    public Vector3 upRotation = new Vector3(0, 0, 22.171f);
    public Vector3 downRotation = new Vector3(0, 0, -35);

    void Start()
    {
        rb = gameObject.GetComponent<Rigidbody2D>();
    }

    void Update()
    {
        if (Input.anyKeyDown)
        {
            rb.velocity = Vector2.up * force;
            transform.rotation = Quaternion.Euler(upRotation);
        }

        transform.rotation = Quaternion.Slerp(transform.rotation, Quaternion.Euler(downRotation), Time.deltaTime * 2);
    }
}
PlayerHealth.cs
Collisions With the "Death" and "Score" Tags
Using the Unity UI, we added BoxCollider2D components to all the pipes, and labeled them as as triggers with the "Death" tag. So when the bird detects a collision, all we need to do is check if the tag is "Death"! When the trigger first "enters" or detects a collision, it calls
private void OnTriggerEnter2D(Collider2D other) { /* code */ }private void OnTriggerEnter2D(Collider2D other)
{
if (other.CompareTag("Death"))
{
SceneManager.LoadScene(SceneManager.GetActiveScene().buildIndex);
}
if (other.CompareTag("Score"))
{
score += 1;
}
}Make sure to add
using UnityEngine.SceneManagement;Here's the final code in case you need it!
PlayerHealth.cs
using System.Collections;
using System.Collections.Generic;
using UnityEngine;
using UnityEngine.SceneManagement;
public class PlayyerHealth : MonoBehaviour
{
public int score;
private void OnTriggerEnter2D(Collider2D other)
{
    if (other.CompareTag("Death"))
    {
        SceneManager.LoadScene(SceneManager.GetActiveScene().buildIndex);
    }
    if (other.CompareTag("Score"))
    {
        score += 1;
    }
}
}PipeLogic.cs
Instance Fields
First, we create 3 fields, a Rigidbody2D rb, and 2 public fields randPosY and speed. randPosY gives a range for the minimum and maximum of randomly generated pipe height. Speed controls the pipe speed going left.
using System.Collections;
using System.Collections.Generic;
using UnityEngine;

public class PipeLogic : MonoBehaviour
{
    Rigidbody2D rb;
    public float randPosY = 2.17f;
    public float speed;
Start and Update
In the Start() method, we obtain the rb component, and set the new position changing the y value only. Next in the update, we ensure that the Rigidbody2D component's velocity is always left at the speed specified by our public "speed" field. This makes our pipe move left!
void Start()
{
    rb = this.gameObject.GetComponent();
    transform.position = new Vector3(transform.position.x, Random.Range(randPosY, -randPosY));
}

void Update()
{
    rb.velocity = Vector2.left * speed;
}
"Destroying" the Pipe
When the pipe reaches the end of the screen, we could destroy it and create a new pipe. However, this could be risky because controlling large amounts of objects can cause memory leaks or be very inefficient. So a solution, is to reuse the pipe.
All we do is detect if it passes the screen or hits the "Cycle Completion Collider" by checking if it hits the "Completed" tag!
If this happens, we can reset it to an arbitray value, in our case, 9.28 seems to work well, but feel free to play around with the values!
private void OnTriggerEnter2D(Collider2D other)
{
    if (other.CompareTag("Completed"))
    {
        transform.position = new Vector3(9.28f, Random.Range(randPosY, -randPosY));
    }
}
Here's the final code in case you need it!
PipeLogic.cs
using System.Collections;
using System.Collections.Generic;
using UnityEngine;

public class PipeLogic : MonoBehaviour
{
    Rigidbody2D rb;
    public float randPosY = 2.17f;
    public float speed;

    void Start()
    {
        rb = this.gameObject.GetComponent<Rigidbody2D>();
        transform.position = new Vector3(transform.position.x, Random.Range(randPosY, -randPosY));
    }

    void Update()
    {
        rb.velocity = Vector2.left * speed;
    }

    private void OnTriggerEnter2D(Collider2D other)
    {
        if (other.CompareTag("Completed"))
        {
            transform.position = new Vector3(9.28f, Random.Range(randPosY, -randPosY));
        }
    }
}
ScoreTracker.cs
Instance Fields
First, we create 2 fields: a PlayerHealth pH and TextMeshProUGUI scoreText.
using System.Collections;
using System.Collections.Generic;
using UnityEngine;
using TMPro;

public class ScoreTracker : MonoBehaviour
{
    PlayerHealth pH;
    TextMeshProUGUI scoreText;
Start and Update
In the Start() method, we set pH as the PlayerHealth script using FindObjectOfType<PlayerHealth>() and scoreText by calling the GetComponent<TextMeshProUGUI>() method. To update the score, we just set the score each frame in the Update() method.
private void Start()
{
    pH = FindObjectOfType<PlayerHealth>();
    scoreText = GetComponent<TextMeshProUGUI>();
}

void Update()
{
    scoreText.text = pH.score.ToString("0");
}
Here's the final code in case you need it!
ScoreTracker.cs
using System.Collections;
using System.Collections.Generic;
using UnityEngine;
using TMPro;

public class ScoreTracker : MonoBehaviour
{
    PlayerHealth pH;
    TextMeshProUGUI scoreText;

    private void Start()
    {
        pH = FindObjectOfType<PlayerHealth>();
        scoreText = GetComponent<TextMeshProUGUI>();
    }

    void Update()
    {
        scoreText.text = pH.score.ToString("0");
    }
}